Life in the Village and beyond, based around the interests of my life.

Life in the Village and beyond, based around the interests of my life. Sunset at Telegraph Point.

Tuesday, May 15, 2012

Chisels and Such

One of the most useful of our workshop tools is the humble chisel.  In historic terms, it is also one of the oldest in homo sapiens' toolbox.  From stone - through copper, bronze and iron - the modern steel chisel has a long heritage.  As woodworking has refined itself over the centuries, chisels have evolved into the variations on the chisel theme that we have today.

We now have bench chisels, butt chisels, paring chisels, dovetail chisels, mortice chisels, and all the variations of carving chisels that you can imagine.  There are likely to be other categories that I have left out.

You will find treatises on chisel types in numerous publications, so I won't go into them here, but the most common garden variety of chisels these days - is the bench chisels.  These are sold everywhere from hardware stores to specialist tool manufacturers, and usually in sets.

Here are some that are on offer at present:


These modern steel chisels can all trace their lineage back to something like this one - a chunky firmer chisel with a socket for the handle.
This one was made by Ward and Payne in Sheffield in England.

It is only one inch wide, but is a beast of a thing and quite heavy - even without the handle.

Modern bench chisels have bevelled edges, which helps reduce the weight of the chisels in the hand, giving them better balance.


To further reduce the mass of the chisel at the handle, it can be mounted with a tang like this old Robert Sorby - also made in Sheffield.


Here is a set of tanged bevelled edge chisels (except for the smallest which is too narrow to carry a bevel).  All of these are English - made in Sheffield, but from many years ago.   Most were made in the first half of the 20th century.  The majority of these handles are English London Pattern chisel handles.  They look lovely but are an acquired taste as far as comfort in the hand is concerned.

They take and hold a keen edge, and more than hold their own against their modern equivalents - when used for general woodworking. Belting holes in jarrah or spotted gum all day will pull them up, but very few of us do that.

Most of these are F Woodcocks (made between 1939 and 1957),  but there are plenty of quality English makers, whose chisels are just as good.  Here are some:

English Chisels
  • Robert Sorby
  • William Marples
  • Hale Bros
  • Charles Taylor
  • Edward Preston
  • S J Addis
  • Lindley
  • Herring
  • Pearson
  • Ward and Payne
  • Alex Mathieson (Scottish)
  • Brades
  • F Woodcock
  • Greaves
  • Thomas Ibbotson
  • I & H Sorby

The best English steel was made from Swedish ore, and has some of those same qualities as the famed, and widely sought after Swedish steel chisel makers - Berg, Jernbolaget, Kronan, Toledo.  Sadly, older English chisels are overlooked in this country, except by those who know how good they are.  Not in the UK of course, where they are still valued.

The point is, that old English chisels are not the flavour of the month here in Australia - either at Sunday Markets or online auction sites. They are cheap, and excellent value for money.  It is easy to put together a set of English bench chisels for very little outlay.

I have put together this set over many years.  If I was doing this again, I would concentrate on the makers in bold type simply from personal preference, and the fact that I consider them to be the best in their class - but there is not much in it.  It may take quite some time to put together a set from the same maker, but a composite set like mine could be done at one Sunday market - for around the cost of a single new 1 inch chisel from the links above.

Because E A Berg - Sweden - chisels are often used as a benchmark for fine steel in old chisels, I will add a link for more information.
For a short history of E A Berg and his steel product making ventures - see here:
E A Berg

Enjoy Your Break
I will be taking a break from The Village Woodworker Blog for a few weeks, while I attend to other matters.  You will have an enforced break from the happenings in this neck of the woods.  Enjoy .....

I hope that your segue from autumn to winter - (late spring to summer for our northern cousins) is full of the joys of the season .....................
.................... and happy woodworking to all .........................

Wednesday, May 9, 2012

Ukes Are Go ......

............... yep, just like the Thunderbirds ..............

One of the greatest aspects of living in a small community is .... well ...... living in a small community.  Telegraph Point is tiny, but has a vibrant community culture.

Apart from Book Group, our own local library, Singing Group, community dinners and BBQ's, fitness group, and pub karaoke, there is the Wednesday night Ukulele Group.

A more zany bunch of pluckers, you are unlikely to meet - from diverse backgrounds, but with a passion for that oxymoron - Ukulele Music.


My stupid camera has a flash delay - that's why everyone looks like a deer in the headlights - but you get the idea.  Of course - the empty wine glasses might also account for that.

One of our inspirations is The Ukulele Orchestra of Great Britain - Oh that we might emulate them one day!
Their rendition of the old Talking Heads song Psycho Killer is mind-blowingly great.  It is one song that we love murdering whenever we can.

Ukes come in all shapes and sizes, the most common, in our group anyway, are the tenor sized ukes. That little maroon one (above) is a soprano - and I play a concert.

Anatomy of a Ukulele

Here is my concert ukulele - a Kanani - beside the LOML's  Lanikai which is a tenor. The body of the tenor is longer and deeper, and it has a longer neck.

Building a Ukulele
Tonewoods are something that have  taken my interest since I decided to build a Ukulele. Now this is totally new woodworking territory for me, so I am in the process of researching methods and materials. I think that I will build a tenor ukulele, as it is the largest with standard uke stringing.

There is a larger baritone uke, but it requires different chord sets, and that may be a bridge and nut too far at this stage.

My Kanani is made of solid Koa - both body and soundboard, and the Lanikai has a spruce soundboard and mahogany body.  Both have rosewood fret-boards.


The roundup of materials will now begin.  I have some African blackwood that will make a good fretboard, and I am going to try western red cedar as the soundboard.


This western red cedar came from panels from my brother in law's kitchen demolition.  Under the paint was some lovely straight grain.


Other ukulele soundboard tonewood timbers that I have a little of, and am considering, are:
  • mango
  • blackwood
  • huon pine
  • black heart sassafras
  • Australian cedar
  • Queensland maple
  • Tasmanian myrtle

I am still mulling over timber for the body, but am thinking maybe blackwood...... hmmmm ...

This task will take some time I think.

In the meantime, here is the song that I took to Uke group last night ..... a blast from the past ..........
Let's just say that - while I love it, ......... ...............
.....................................................it is growing on the others ....................


Happy uke-ing .....
.... and happy woodworking to all ...............


Saturday, May 5, 2012

Doo Doo Doo, Looking Out My Back Door ........... *

* .... no, not John Fogarty, or even the Salvador Dali-esqe images from the old Creedence song .....

....... just some of the beauty that constantly surrounds us, and which it sometimes takes a stunning autumnal day to remind us of ............


Here, the native dahlias peek over the top of a bird-sown cottoneaster.  Poor old dahlias always bloom at the end of summer, and try to get their seed making done before the winds pick up and blow down their fragile stems. Ours can be five to six metres (20 feet) high.


Cottoneaster berries are a vital food source for birds in hard times, and as winter draws on and other food is scarce.  Silver-eyes love them, but they also support our local satin bowerbirds, who eat everything.  It will be a month or so before we see them.

Boxwood, as used in old quality tool handles, is hard to get these days.  Cottoneaster timber is often used as a substitute - not quite as tough, but very similar in colour.

Cottoneaster flowers here a foodsource for the native bees during the warmer months. Native bees are tiny, (they are the fly-spots around the mouth of the hive below) and they are very laid-back.  They won't even come out of their hive unless the temperature reaches 18 degrees Celsius (64.4 deg F)


Here is our little native bees hive - sitting on our veggie garden fence-post.  They are great pollinators and the garden benefits from them enormously.


They produce small amounts of very rich honey.  We'll leave them the fruits of their summer labour, as they will need it to get them through the winter.  Next year we'll get some honey from them, and maybe divide the hive.


Here they sit above one of the last of the summer pumpkins.  This is a jap - one of the tastiest pumpkins in the whole pumpkin family IMHO - anyway they are my favourite and are fantastic in a baked meal.


The LOML has created her own little bamboo garden, and it is showing off some of the bromeliads which are in flower at present.


As well as the broms, the elkhorn ferns have done well and are growing on the small trees at the back.


This monster is growing a little further back.


Compared to her works of bamboo art,  mine are very rough and ready, and a sort of -in your face clumping type. Oldhami and painted bamboo are the two that I have planted.


Of course the liquid ambers are also responding to the season, and are beginning to change into their autumn coats.

Not a patch on what our cousins in the colder climates see, but a pleasant reminder of that riot of colour that happens in the northern hemisphere during their Fall.


While we all rejoice in the palette that the change of seasons presents us, nothing gladdens the heart like a growing woodpile to help ward off the coming winter chill.


My woodwork lately has been cutting and stacking firewood.  I did notice during these chores that some of the wood chunks had very pleasing grain, but I was too tired to do anything but keep throwing the pieces on the pile.  I made a silent promise that I would go back as the pile diminished and fish them out ............
..... I have a feeling that this is one promise that I may not keep ...............

 There is something about the smell of fresh split firewood that bodes well for the winter.

May your autumn senses be filled to capacity and your cup of joy overflow ............

................ and happy woodworking to all .............................

Sunday, April 29, 2012

Used and Abused

I have been working with my son for the last five days, demolishing, repairing and re-building his bathroom.  That is another story, but during the re-build, we needed a rough-house chisel, and mine wasn't handy so he produced one from his shed.  We only needed a beater, and what he found filled the bill nicely.

When he'd finished, he passed this chisel to me.

Oh my sainted aunt!


The handle was the first clue - birch - and the shape - definitely Swedish.  One look at the blade told me it was something special.  That same bevelled edged shape has been used by Jernbolaget, Kronan and Erik Anton Berg.
I was ready to weep.


Here it is next to a Berg handle - fresh from the market.
Closer inspection showed it for what it is:


Swedish Toledos are excellent chisels and make fine parers.  They are to be cared for, honed and used for the purpose for which they were manufactured - paring, with a razor sharp edge.
Let's check that edge:


Holy opened paint tins Batman!
It's a super-dull maxi-fat-edge chisel, of the non-cut variety.
This looks like a job for the dynamic duo - wire wheel, grinder, oilstones and arkansas stone.  (OK quartet!)

A quick cleanup revealed the problems ahead.  No serious pitting thank goodness.


................The back needed re-flattening, and the bevel - (what bevel?!!!!!!!!) -  needed re-grinding after the edge was squared to the sides.


That poor old handle had been belted so much that it had lost a full half-inch of its length.  Furthermore, it was cracked all the way through both sides. Only the ferrules were holding it together.


Time for a new one.
 I remove old handles by gripping the blade between scrap leather in my Carter vice, and tapping a suitably sized open ended spanner against the handle.  If the handle is worth keeping, I pad the spanner as well - not in this case however.


With an inch of blade already gone, this chisel begged for a longer handle in the Japanese paring chisel style.  I'll try to stay true to its Swedish origins with the profile, but there will be no top ferrule.  This chisel will never again be struck.


I have chosen a piece of black wattle from my wood-cave for this handle.  Black wattle grows wild around here, and is a plentiful, renewable resource.  It has some pleasing grain and will serve very nicely.  As before, with the Sorby chisel, I have accentuated the length in this handle, as I enjoy the added control that this imparts to the chisel when paring.


A coat of beeswax and a quick polish with a handful of shavings, and the handle is complete.
Here is the finished article: one Toledo Steel - Made in Sweden - Bevelled Edge Paring Chisel!


Once again, a good test of the keen-ness of the blade, is how well it pares end grain.

Not too shabby at all!

Now that is a real feel-good ugly duckling story.

I'll have to find another beater of a chisel for my son to return to his shed.  Something with a plastic handle this time.  Hee hee!  This one can become his going out chisel, only to be used on Sundays.......

May all your uglies turn into swans, and all your problems be small ones ...............

....... and happy woodworking to all ...............


Wednesday, April 25, 2012

Beginning Woodworking - A Basic Woodworking Starter Kit

I am often asked, particularly by parents who have a child interested in woodworking, what is a sensible basic starter tool kit.  I have thought about this a lot, and have usually referred them to good old Google to see what is recommended elsewhere.

I tried it myself recently, (Googling), and was disappointed with the results.  The kits were either too elaborate, or attempts by commercial enterprises to flog off tools that weren't selling.

Sooooo ........ I have put my limited grey matter to work, and come up with my own basic tool kit list.  These tools are based on what I have seen my grandchildren use in my own workshop, and I have left out tools that they cannot handle.

Having said that, I don't think that there are any essential omissions.  In other words, this starter kit would suit anyone commencing woodwork.


Okey dokey - measuring and marking time.
  • 300mm (12 inch for you foreigners) steel rule
  • Steel retractable tape measure -5m, 8m, 10m ... whatever you can find .... length isn't that important.  Handy to have a stopper button like this one.  I like the metric/imperial tapes, but children should have one or the other - too confusing otherwise.
  • Combination square - 90 and 45 degrees
  • Pencils - HB or H - kids always press too hard
  • Pencil sharpener

Screwing and nailing:
  • Warrington hammer - easier for kids to use than a standard claw hammer, as it isn't as heavy and is better balanced.  There are different sizes in these, so take the kids to the markets and get them to try the hammers before buying.
  • Nail punches - flat ended - 1/8 inch and 1/16 inches wide at the tip
  • Screw drivers - flat bladed and phillips head (posi-drive) -  small and larger in each

Chiseling and sharpening:
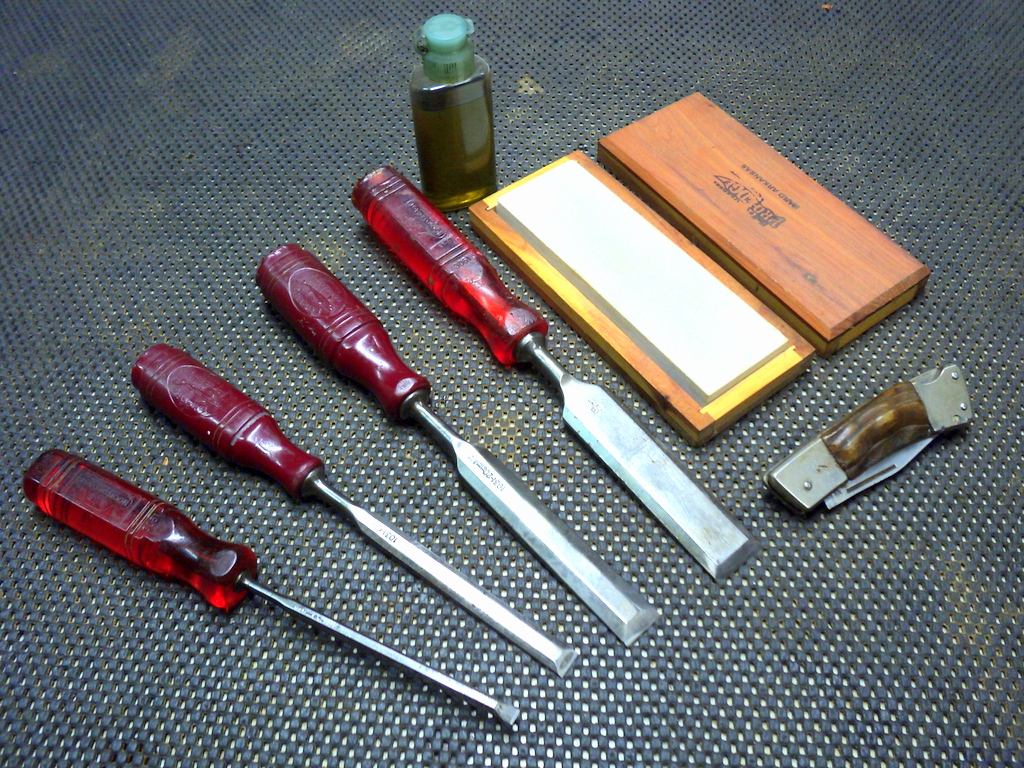
  • Four bevelled edge chisels 1/4, 1/2, 3/4, and 1 inch wide.  Older chisels are usually better than the new consumer chisels from the hardware stores.  Again, the markets are your friend.  Best value around at the moment are the older English bevelled edge chisels - anything made in Sheffield.
  • Pocket knife - useful for so many little jobs around the workshop. In Australia you have to be over 18 to own one of these - Jeez, talk about the nanny state!
  • Oilstone - and protective wooden box - for sharpening.
  • Sharpening lubricant - I use a kerosene/oil mix of 3/1, but straight kerosene would probably be OK. Plastic squeeze bottle is from a hair-care store.
  • Beginners might like to use a honing guide - not shown here but follow the link.


 Sawing:

 For kids, a shorter hand saw is better than a longer one, as they have more control over the cut.  You won't need all of these saws, but two would be good.
  • An 18-22 inch crosscut saw with around 8-10 teeth per inch is most easily managed.  Number 1 is a Disston American Boy - 18 inch X-cut saw. Number 2 is a 20 inch Warranted Superior X-cut saw probably made by Simonds.  Number 3 is a 22 inch X-cut Spear and Jackson.  Of all three my grandkids prefer the 22 inch saw
  • A tenon saw has a brass or steel spine to stiffen the blade and children handle this easily if it has smaller teeth - say 10-12 per inch. Cross cut of course.  This one - number 4 - is a Tyzack.
  • There are no rip saws shown here, and children struggle to use them anyway.  Most of the timber that kids will use will be milled and dressed. If not, they can ask an adult to use a power tool to do it for them.  Kids faced with hand ripping, will simply lose interest very quickly.  As far as timber is concerned, it's better if it is softwood - lighter and easier to handle.

 Planing and Smoothing:

A hand plane is one tool that kids love using. Since most timber used by children will be dressed, they can start with a block plane - Number 1 above - for all those small jobs.  It is a good size for small hands, and the blade is narrow enough that it isn't too hard to push.  This one is an older Stanley 102 - a great little apron plane.

As kids get older and can handle heavier tools, a smoothing plane like this Stanley Number 4 (actually numbered 2 here) is a logical next choice.  For youngsters, a number 3 sized plane might be better, as it has a narrower blade and is easier to push.  These - the Stanley 4 type - are the most common sized plane everywhere, and once again the older ones are better than the new stuff being sold in hardware stores.  Another trip to the markets!

Number 3 is a jack plane, and is longer at around 14 inches.  It is great for shaving off a lot of wood in a hurry, but may never be needed by youngsters. Older woodworkers will find it to be sooo useful.  This one was made by Carter Tools right here in Australia.


Drilling:

Don't ask me why, but kids love drilling holes.  A decent hand drill with double pinion gears like this one is just the ticket.  Of course there are plenty of cheap cordless power drills around at the moment, but most youngsters don't have the strength to handle them.  OK for older, stronger children though.
A hand drill like this one is great for hand-eye co-ordination, and for the development of fine motor skills.

A decent set of sharp drills is a must.  Kids are prone to break the finer drills in a drill kit, so supervise these if they have to be used.

..... and that is about it.

I really don't think that there are any other essential tools.  With this kit, nearly all woodworking tasks that children will address will be covered.  This same set of woodworking tools would be an excellent starter tool chest for any beginning woodworker.  Of course there are absolute buckets of extra tools that could be added.  These can be acquired as the need arises, and as woodworking skills develop and grow.

Now, there are plenty of other tools that I use regularly, but they aren't essential, just desirable and useful. If you get bitten by the handtool bug, there are dozens of ways of expanding your knowledge and ability to use them well.

Just to inspire you further, here is a chest of handtools that were once owned by a piano maker known as H O Studley.  Feast your eyes on the tool chest that he made for his tools :

Picture courtesy of Fine Woodworking - see link above

OK ....... a woodworking tool kit can be put together piece by piece.  Knowing what's important and what's not, helps us focus on essentials.   My list above can be a guide for birthdays and Xmouse presents as well.

Hope it was of some help.........

.....  and happy woodworking to all ..............

Saturday, April 21, 2012

Falcon Pope Hand Planes - A Small Review

One of the joys of any road trip is the encounter of the unexpected.  I had the good fortune to encounter some pieces of classic Australian post war hand tool manufacturing, in the form of two Falcon - Pope handplanes.
These are the less common F 5-1/2 and F 4-1/2.  What a great opportunity for a mini-review.


These have spent the best part of the last sixty years in a trade college, but show signs of very little use, in spite of some running repairs to moving parts.  The handles are dented and dinged about from rough storage - trade schools can be tough on tools.

 Falcon Handplanes were introduced just after World War II in 1946, and had ceased manufacture in 1956 - a very short history to be sure.  Yet they were an essential part of Australia's post-war development and housing boom. They were contemporaries of  Carter and Turner - other plane manufacturers in Australia.

The F 5-1/2 seems to be completely original, right down to its two piece depth adjuster yoke.

The F 4-1/2 has had a couple of modifications that, I assume, were essential replacements to keep it in service.

The most obvious of these is the addition of a Carter - Australia - Blade.  Less obvious is the substitute depth adjuster wheel, and one piece yoke that engages the cap-iron.
I am guessing that these were added to replace "lost" items.


Both planes are well made, with flat bases and sides that are square to the soles.  The frogs are made of cast iron, and on both, the sloped surface that supports the flat of the blade was well machined and completely co-planar.  Later Pope planes had alloy frogs that were sometimes prone to bending - not so in this case.
 The depth adjusters on both planes showed a certain amount of "slop" or play between the forward and backward engaged positions.  The split yoke on the F 5-1/2 had around 2 full turns of the brass depth adjuster, the F 4-1/2, had only a little more than one.  The solid yoke may account for this.


For comparison, here is the F 4-1/2 frog beside a 1920's Stanley frog.  The Falcon Pope has a little lateral movement when the frog screws are loosened, where the Stanley has none.  Stanleys of this era were among the best ever made, and their parts fitted together with very tight tolerances.  The Falcon Pope tolerances are a little broader than that.

 One thing that I have noticed on all Falcon Popes that I have seen, is the angled nature of the recesses for the frog screws.

The Stanley has recesses whose rear is at 90 degrees to the surface where the screws engage.  The Falcon Pope's seem to be undercut. This does cause the screwdriver to jam against the frog when tightening the frog screws after adjusting the frog forward.  Angling the screwdriver solves this, but it is impossible to engage the full flat of the screwdriver blade in the screw slots as a result.


The mouths of both Falcon Pope planes are square to the sides and a good size to accommodate the blades.  They are more carefully machined and a more precise size than those of Stanleys that were being produced around the same time.  They more closely resemble the quality mouths produced on Stanleys from a much earlier era.

Both of these planes have mouths that are the same size - it is the difference in blade thickness that creates the fineness shown here.


Falcon Pope blades are thicker than the standard Stanley offering, and the Carter blade found in the F 4-1/2 is thicker again.

Using these planes is quite a pleasure.  Both of them are heavy - with thick castings.  Compare the cheeks of the F 4-1/2 to those of the Stanley beside it in the picture - three above.  A standard Stanley 4-1/2 plane weighs 4-3/4 lbs. The Falcon Pope F 4-1/2  tips the scales at 5-1/4 lbs ....   quite a beast!

The mass of both of the Falcon Popes,  ensures that they both absolutely breeze through timber in the planing process.  Here is a piece of ropey old radiata pine that I set to with first the F 5-1/2 Jack, and then the smoother - the F 4-1/2.


Good thick chunky shavings from the F 5-1/2.  Wood removed in short order - great fun.


Much thinner shavings from the F 4-1/2, and a quite acceptable finish. This from the Carter blade as found with no further honing.


For a quick comparison, here is my Bedrock 604-1/2 with a Lie Nielsen Blade, and the shaving that it produced.  Much better.


Here is the result after honing the Carter blade. Virtually the same as the Lie Nielsen.
And look at that surface - glassy smooth.
Not too shabby at all.

 Instead of the traditional japanning, these planes have a painted stippled finish that is quite pleasing to the eye. On these two planes it is still near complete after sixty odd years, showing little - if any - wear. Obviously this was a quality choice by the original manufacturers.

These are very good planes, and well worth using in any workshop.
It is a shame that they were produced for such a short period of time, and that there are so few out there.


Finally, it is great to take pride in the fact that they were made right here in Oz.
For anyone looking for a very well made, Australian-built handplane, these can still be found at Sunday Markets and online auctions.  Well worth the investment.

Happy shavings partners .....
.................... and happy woodworking to all ..............


Well it has been nine years since this review, and I have now the opportunity to add to it.
A Falcon F5 came to me some time back missing all but the bed and the frog.

It shows the same quality as the previous two, and was worthy of bringing back to working condition.

I found some donor handles and looked around for a blade, cap-iron and lever cap.


I wanted an Australian made blade but did not have a Falcon, a Pope or a Carter in the right size, but I did find a Titan. This blade is a bit special as it has a high speed steel tip brazed to the blade body, and holds a sharp edge for a long time.

The only cap-iron that I had was a two piece - modelled on the Record Stay-Set irons, so it went in as well.


I found an old Stanley keyhole lever cap which fitted well.


With that, the plane was now complete and performs beautifully.
It is delightfully well balanced, and an ergonomic joy in use.

Another plane worth looking for if you are after a number 5 sized handplane for your workshop.
Happy shavings...........................