Life in the Village and beyond, based around the interests of my life.

Life in the Village and beyond, based around the interests of my life. Sunset at Telegraph Point.

Tuesday, July 31, 2012

Building a Ukulele - Part 5 - Backs and Necks

Yep, the rosette cutter is still over in Wauchope, so the soundboard still awaits.  However, not to waste time, I did some work on the back and the neck today.

The back, like the sides, is made from sassafras.  I cut these two bookmatched pieces from a board milled over at the Hastings Woodworkers Guild Clubrooms.  It has a little character that pleases, and hopefully will have some nice tonal qualities in the finished ukulele.


I have made an MDF template for the tenor sized ukulele, and to create the little bit of overlap that I need, I use a washer with the pencil in the marking out - silky smooth.

There are some ragged parts around the edges of this sassafras, but that was in the board when I ripped it.  Positioning the template carefully avoids these.

I will be careful to save the offcut at the top, as this has just enough width to be used as a centre strip, to re-inforce the glue join in the back.

Its grain is short and it will sit across the join at right angles to the run of the grain in the back.  Waste not - want not.

 It has the bonus of having the same tonal quality as the back, so may be an advantage in the sound department as well.

The bandsaw makes short work of cutting out the back.


 There will be three braces across the back - one across the waist and one across each of the bouts (the widest part at the top and the widest part at the bottom) - upper and lower.
These are radiused on the 15 foot sanding block that I made earlier, and the curved sides are glued to the inside of the back, giving it a gentle curve.


I really should make a jig for this, but in the meantime here is the glue up with numerous clamps and their packing.  The braces still need shaping, but I will do that when they are firmly glued and dry.


While the back dries, I started work on shaping the neck.  It is waaaay oversize at the moment and shows all the rough cutting from the bandsaw. 
The headstock needs smoothing, and this will be dressed up with a glued on piece of veneer after it is shaped.  I am using this little Lie Nielsen block rebate plane, as it can plane right up to the tiny lip that seats the nut.


After some refining of the shape, it is time to start rounding the neck to a more gracious curve, that will be kind to the left hand that plays the fretboard. 
I am using course and finer rasps at this stage, and have to be extra careful - as these can remove a lot of wood in a very short time. 
Here is where the jig that I made, to hold the neck while shaping, comes into its own.

Things are coming along nicely.  Once the neck is formed, it will be time to bend up the body and glue in the end blocks.

Can't wait ..................

Wednesday, July 25, 2012

Building a Ukulele - Part 4 - Moulds and Jigs

These are a necessary part of any ukulele build and the time taken to prepare then is returned multi-fold down the track.
I have used an outline from the LOML's tenor ukulele body.  That particular uke has such a sweet sound - let's hope this one is as good.


The body mould is made from laminated scraps of MDF and particleboard, while the interior retainers are simply radiata pine with cable tensioners used as expanders.  The mould is made in two pieces so that the body can be removed when complete.


The neck brace is made up of some 4"X2" radiata pine scraps that will be held in the bench vice in use.  It has a sliding headstock support, made from an offcut from this neck and some scraps that have been glued together. 

A sliding bolt anchors this in any position to suit the length of the neck being worked on. 
This ukulele neck is a tenor - a concert and soprano have shorter necks, and a baritone neck is longer. 
This jig will support them all.

The back braces have to be formed on a radius of 15 feet, so a sanding block - cut to this profile - is necessary.  A 15 feet length of string and a pencil are all that are needed to mark this out.


After marking it out and rough cutting, it needs smoothing.  What better than a compass plane to finish this off.  Here I am using a Record 020, which has a sole that can be adjusted to the required curve.  Planing has to take place from the ends to the middle - to avoid tearout.  This planes with the grain, and not against it.


I was hoping to have the soundboard made, but I took my newly made rosette cutter across to The Hastings Woodworkers Guild Clubroom on Saturday, and foolishly left it there.


So I have had to make myself busy on other aspects of the Uke build until I retrieve it.  It's over an hour's drive, so I'm going to leave it there until next time I visit.

Tomorrow, I'll start cutting out the sides and the end blocks, as well as forming up the back braces and gluing up the  the back.

The back and sides are sassafras, and the soundboard will be western red cedar.
Tomorrow will be busy.

Happy woodworking to all ................ and ........................
May your life sing ....................


Tuesday, July 17, 2012

A Commission - Ukulele Interruptus

Been away ....................... back again - and itching to get on with the tenor ukulele build.
However ......................
.............a project for a client has interrupted the music of uke building for the moment.

Re-shaping the World -
A Desktop Globe With A Wooden Frame


Here it is - (well it is very similar, I have dismantled the one I'm working on) - a desktop earth globe, whose metal and plastic frame is to be replaced by one made from Australian rosewood.  This has exercised my creative cortex for a while now, and I have finally come up with a solution that is both simple and practical.


The main part of this construction is the equatorial ring that supports the globe, and is in turn supported by the legs.  Rough cutting the internal circle left some spokeshave work to do, to get it smooth.
I love rosewood, it is so easy to work, and soooo forgiving.  Planing around the flat edges of this circle meant that there would be many times when I was planing against the grain - and across it.  I started with my Millers Falls number 6, but soon had to reach for a smaller plane.  Those shavings in the background are all from that process - gorgeous!


A small low angle block plane handled this easily.  This is the little Lie Nielsen violin makers plane that I bought for the ukulele build, and it is perfect here.


For the lower circle that will brace the legs, I had to rip down to thickness from a suitably sized block of rosewood.  It could have been planed to thickness, but I wanted to keep the scrap ripping for ukulele parts.  In planing, all that is produced is shavings, where - by ripping - I can salvage some timber for later use.
Here, the Millers Falls squares the edge before I start on the table saw.

After running each edge over the tablesaw blade, I finished off with my Tyzack Nonpariel 6 point ripsaw.  Ripping to thickness by hand is not one of my favourite pastimes, but this saw really sings - and it is as close to a pleasure as ripping can get when I use it.  A truly beautiful saw is this one.

It might be Nonpariel, but it did a good job of cutting parallel in this case - heh, heh!  (my kids hate my jokes!)

As you can see, I marked the circle on the wrong face (or I ripped the wrong face - take your pick) - easy fixed though.

The lower, smaller ring gets the same treatment as the upper ring, and there is plenty of work using the round bottomed spokeshave.  This is the Veritas model, but there are plenty of others equally as good.  Because the shave must go with the grain, and the grain changes so often in a circle, the workpiece had to be re-positioned in the vice many times over the course of this smoothing.

The legs are my own design, and are meant to complement the curves found everywhere else on this globe stand.  They will stand wider than the original model for added stability.

Trial fitting before glue-up.  Trusty 4 inch Silex square to the rescue.
The legs are fitted to the top ring with dowels and secured to the bottom ring with brass screws. No these aren't brass - I'm still waiting for them to arrive.


Glue-up time.  Glue-up takes place with everything in position so that there are no regrets when it dries.  The lower ring (top one in this view) can still be removed after the glue dries, but provides the tension and the bracing for the legs at the moment.

A coat or two of finish - and we're done.


Now - let's have a crack at the soundboard for that tenor ukulele ..................
Bring it on .................!


Thursday, July 5, 2012

Building a Ukulele - Part 3 - Making A Rosette Cutter For Soundboards

I don't have one, I need one, I have no idea where to buy one - so I'll make one.

After the soundboard is assembled, and before I fit it to the body, I will have to cut the inlay for the rosette, as well as the sound hole itself.  So I need a circle cutter.


I found a couple of scraps of jarrah which will serve nicely, as well as a sliver of tool steel that has been kicking around the bottom of my tool box for decades.  I can't remember where this originally came from, but it will make an ideal knife. 
Other blade materials could be an old jigsaw blade, or a piece of hack saw blade or bandsaw blade - ground to shape.

I ground a skew before establishing a bevel, then sharpened on my oilstone and honed on white arkansas.


My first step was to cut a piece from the side of the scrap - the same width as the knife blade.  This will be used for the wedge to hold the blade in place, as well as the sides of the body.

The knife will be positioned towards the end of an arm that slides within the body, and is held in place by a second wedge.  More on this later.


I start with the housing for the blade and its wedge, and make sure that this is finished before shaping the arm that carries it.  This is important, as it gives a solid block to work with while cutting the housing.


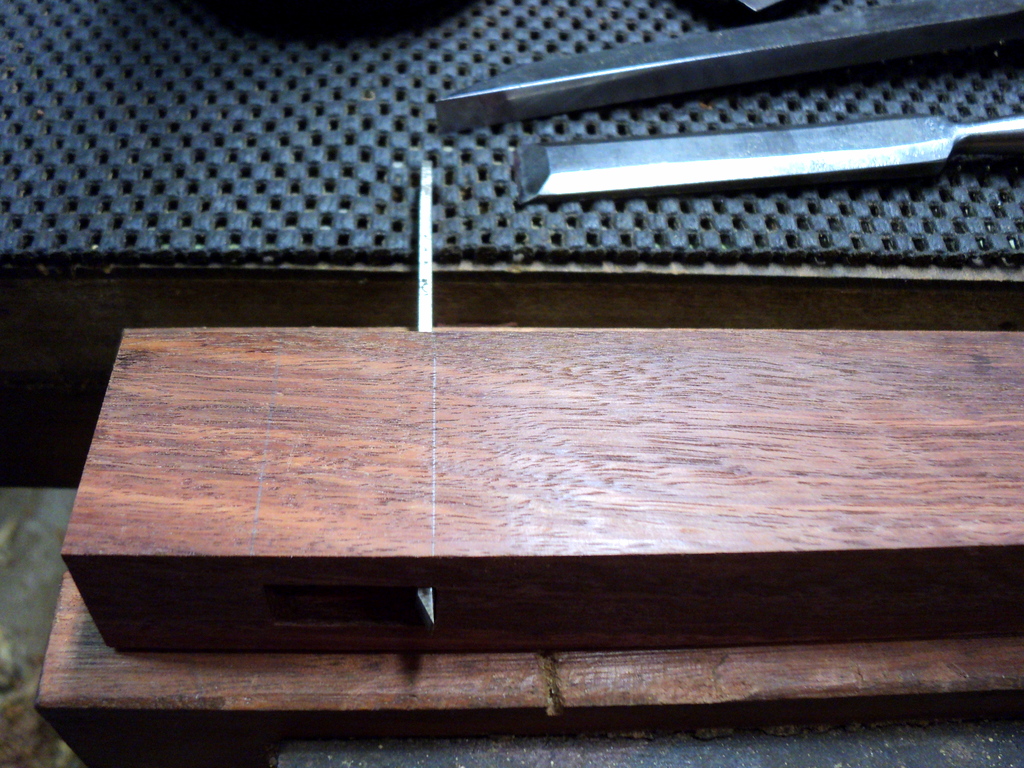
The housing is cut just like a through mortise.  After marking it out, I drill out some of the waste - from both sides toward the middle (to stop tearout at the bottom), which would happen if drilled all the way through from the one side.
The knife side is that end of the housing closest to the body, so this has to be vertical.  The outside end of the mortice is sloped to take the wedge.  Don't reverse these, as this puts the knife too far away from the centre point, and limits the size of the minimum circle that can be cut.


I use a Narex morticing chisel and one of my bench chisels to clean up the inside walls.  The Narex is made in the Czech Republic, and while cheap to buy, is well up to the task of handling this hard old jarrah.  The bench chisel is a Pexto - nee Peck, Stowe and Wilcox -  one of the best from the golden age of US tool manufacturing, and up there with Swan and Witherby.


Once the housing is finished, the sliding arm can be shaped.  I keep the offcuts to be used in the body and the wedge, as they are exactly the same width as the sliding arm.  Two pieces from the first ripping and the offcuts make up the body - glued and screwed.

Here are the assembled parts before gluing into place.  The shape will be refined after the glue dries.


Cut the wedge for the knife, and glue and clamp.

Insert the centre pin, (a broken drill bit) and - voila - all done!


So ............... how does it cut ................?


Not too shabby at all .....................

Love life and live .......................


Monday, June 25, 2012

Building a Ukulele - Part 2 - Cutting The Timber For The Back and Sides

I have a single board of sassafras that I want to use for the back and sides.  This means that it will need to be ripped across its width to create a bookmatched pair for the back, and another pair for the sides.
So - four pieces needed.
Ripping veneer sized sheets on a bandsaw takes a little care.

Here I have just finished the first cut, and the second is under way.
I have designed a shaped pushstick that also holds the timber against the fence.  This is vital for the last few inches of the cut, to protect one's fingers.

Normally I would dress the new side surface before cutting, but I had so little spare timber to work with, that I widened the cut just a little more and crossed my fingers.

For the last cut, I reversed the board and used the other dressed side against the fence.


Here are the first two straight off the saw.
This was very, very slow work - one millimetre at a time, but I was pleased with the result.
Plenty of extra work ahead to remove the saw marks and bring down to finished thickness.


OK - preliminary smoothing has given me enough timber to choose from.  The thought occurred to me that there might be enough for a sassafras soundboard as well.  I'll check that out next time.

Laminating The Neck

While the bandsaw is still humming, I'll cut the laminations for the neck, and get those glued up and put aside while I address the next stage of the body.


Here, I have drawn a rough outline of the neck on the side in chalk.  A piece of rosewood separates the other two pieces of the neck and these will be glue-laminated together.


The rosewood needed straightening.  My good old Stanley number 7 jointer made short work of that.  It has a Sargent blade - a little bit thicker than the equivalent Stanley, and excellent steel.


This is a neck blank freshly glued.  I use old scrap melamine for cauls here, as the plastic surface resists the glue very well.  The neck blank looks too wide at this stage because it is the width of the head. The headstock is integral to the neck, and not scarf jointed onto it as is sometimes the case.  The whole neck will be shaped when it dries.

The fretboard will glue to the top and cover the laminations, but they will be visible from the back.  I intend to make more than one ukulele, so I have glued up a few laminated necks.  Quicker to do as a batch lot.

Things are going to slow down a bit now as I have to build a mould and work out a method of bending the sides as well.

It has been fun so far ..............

Sunday, June 24, 2012

Building a Ukulele - Part 1 - Timber Selection & Layout

My first Ukulele - here goes ..................

I've been ruminating on this for weeks now, and it's time to make a start.  After much research, and not a little searching for appropriate timber, I'm actually in the starting blocks and ready to go.

Since this is my first Uke, I am going to treat the whole build as a learning experience.  Join with me and watch the progress and the mistakes as we travel this luthiered road together.


Timber Selection

I have acquired some very nice timber for the project(s) but have decided to keep the better pieces for later builds, in case I stuff up badly on the first attempt. 
Some tonewoods that I have acquired for the tops and the body includes:
  • Huon Pine
  • King Billy Pine
  • Tasmanian Myrtle
  • Tasmanian Blackwood
  • Black Heart Sassafras
Here's what I'm going to be using this time around:

The soundboard will be western red cedar.  These pieces have been ripped down from some ship-lap boards from my brother in law's kitchen - left over after his recent renovation.  They are very old and nicely quarter sawn.

The fretboard, headstock and bridge will be made of Australian rosewood.  As this is my first ukulele, I am bound to make some mistakes in the build.  Better to do that with less exotic timbers, and save the good stuff for later ukeuleles.

Just to refresh your memory on uke nomenclature here is a quick revision:


The back and sides will be ripped from some figured sassafras, and the neck will be made up of some laminated straight grained sassafras as well.

The linings will be made from paulonia - because I found a piece in the woodpile - and it is light and should prove quite satisfactory.

Making The Linings

Linings are the curved strips that adhere to the sides and assist the gluing of the soundboard and the back of the ukulele.  These can be purchased from music suppliers, but I decided to make my own.

I'll use the table saw, and this is what I will end up with before cutting into strips:


To get to this point, I made up a little jig which is screwed to the mitre gauge.  It is simply a pin hammered into the face of the mitre gauge - 5mm from the cut line.


The cuts are made in the surface of the piece of paulonia so that they leave about 1/8 of the thickness remaining.  These multiple kerfs allow the linings to be bent, to follow the curves of the sides of the ukulele.

After each cut, the kerf that has just been made is placed over the pin, and the cut repeated 5mm away.  This continues until the board is mostly kerfed.  There will be a small amount at the end that won't be done, as it is too small to be supported by the mitre gauge - and too dangerous to attempt without it.


Once the kerfing is complete, I cut this kerfed board into thin strips on my bandsaw.


Here are the finished linings:


The linings are easy to bend, and will be put aside until the body assembly stage of construction.


Next step will be to rip the pieces of sassafras for the sides and back.  That will have to wait until next time.

This is going to be fun ...... can't wait ........

...... and happy woodworking to all ....................

Thursday, June 21, 2012

Cheap Chinese Chisels - Good Value - Or Just Plain Junk?

A Small Review

They are multi-branded and ubiquitous - racked on shelves in discount stores, bundled in hundreds at Sunday Markets, sold on the internet by the thousands, and packaged in boxes at every hardware store in the country.

I have seldom even given them time of day - let alone taken them seriously.  Funny how end of financial year sales can trigger a person's consciousness to think in a completely different way.

I was in our local big green hardware store last week (because it has a toilet and ........ never mind!) and I had to pass the GOING CHEAP sales trolley.  There it was - a box of Trojan bevelled edge bench chisels for $15.

How bad could they be?

Now, a set of five Veritas bench chisels sells for $295 plus freight, and a set of five Lie Nielsens is $340.  A set of six Ultimax Harold and Saxons will set you back $750.

For less than $4 each, these seemed insanely priced - even if they were junk.  If that turns out to be the case, I could always use them to open paint tins.

To say that my expectations of these chisels were low, is almost akin to the hopes that supporters have for the success of the Parramatta Eels and the Western Sydney Giants this year.

So, off to the checkout to part with some small change. 
You know that these have a lifetime warranty quipped the checkout chap.
Yeah, sure, as soon as they break, their lifetime is over - thought I as I walked out the door.


Here's what was in the box - four bevelled edge chisels sized 1/4, 1/2, 3/4 and 1 inch.  On the front - precision ground for easy cutting ......!   Hmmm, the grinding might be precise, but it was done with a fairly coarse grinder - look at those striations on the back of the blade.

So, first task will be to flatten the backs of all four chisels.

Here was the first surprise - the backs were all quite flat and didn't need much to remove the grind marks. Only the area closest to the edge of the blade needs immediate attention, the rest will get flattened over the course of the chisels' sharpening lives.


The bevels that create the cutting edge were indeed precision ground, and merely needed a touch up on the fine oilstone, followed by a honing on a hard white arkansas stone.  In both cases I use a kerosene/oil mix of 3/1 for lubrication.


The handles are made from red polycarbonate, and can take a beating.  There is a black rubberised material on both sides to aid hand use and provide grip.  The blade has a type of socketted tang connection to the handle, which is moulded onto it.

The handle flares just before the blade, and also has a built in hollow for the thumb.  This works equally well with the left or the right hand.  I am right handed, and when I used the chisels for paring, they felt very comfortable - the design obviously works.

Sadly, I discovered the hard way that the side edges of the back of the blade were quite sharp - a by product of the precision grinding no doubt.  Nevertheless, while paring, it is my custom to support the blade in my left hand and slide it forwards into the cut with my right.  My left index finger sported a band-aid for the rest of the day.

All of the blades need the edges relieved on the oilstone to prevent this occuring again.

So - how good are they?


An easy test that anyone can perform on a sharpened chisel - is to see how well it handles the paring of end grain.  I tried paring blackbutt, rose gum, spongy pine, and even western red cedar.  These latter two are likely to simply fold under dull chisels.  No trouble at all.  Above is a sample series of cuts in black wattle - like a hot knife through butter.

They even come with plastic blade guards to keep them sharp and protect one's fingers.


Will these chisels slice through jarrah and gidgee all day - don't know - probably not, but what chisels will.  I usually don't use those timbers, and neither do the majority of woodworkers, I'd venture to suggest.  For the kinds of woodworking that most of us do, most of the time, these chisels will not only be fine, they will perform very well.

Clearly they aren't junk - if anything they are an absolute bargain - even at full retail price.  On sale, they are a steal, and they would not be out of place in any workshop, or as a set in a mobile tool chest.

...... and happy woodworking to all ........