Life in the Village and beyond, based around the interests of my life.

Life in the Village and beyond, based around the interests of my life. Sunset at Telegraph Point.

Monday, June 23, 2014

Making A Boat Paddle Tenor Ukulele - Part 9 - Front and Back continued

Front and Back Skins

Previously, I have cut the four halves from a single piece of mango, and the bookmatched pairs were glued together to make two sets of skins - one for the front and one for the back of the ukulele.
The piece with the most figure will become the back - since the front will have a sound hole cut into it and a bridge glued onto its surface.  So it will lose some of its beauty.

The Back

The back needs cross bracing as well as a strengthening piece glued down the spine.
I start with the cross braces because the back has to have a radius, and it is easier to curve the back before applying the stiffening of the piece up and down the middle.
The cross braces are radiused on their edge to be glued to the back skin, and this gives the curve to the back of the uke.


 A normal hour-glass shaped uke has three cross braces, but this cutaway design has so much strengthening at its neck, that the third brace up there may well limit its acoustic qualities by making it too stiff.  So I am only using two braces this time.
I'll see how well it plays, and if it is a bad move I will correct it on my next uke.


Traditionally cross braces are made from quarter sawn spruce.
I don't have any, so I am using Huon Pine as a substitute.
I have made these slightly over-sized, and will plane them to shape once the glue is dry.


The edges are pared down to around 1/16inch where they meet the sides of the ukulele body.  I use a sharp paring chisel for this task.
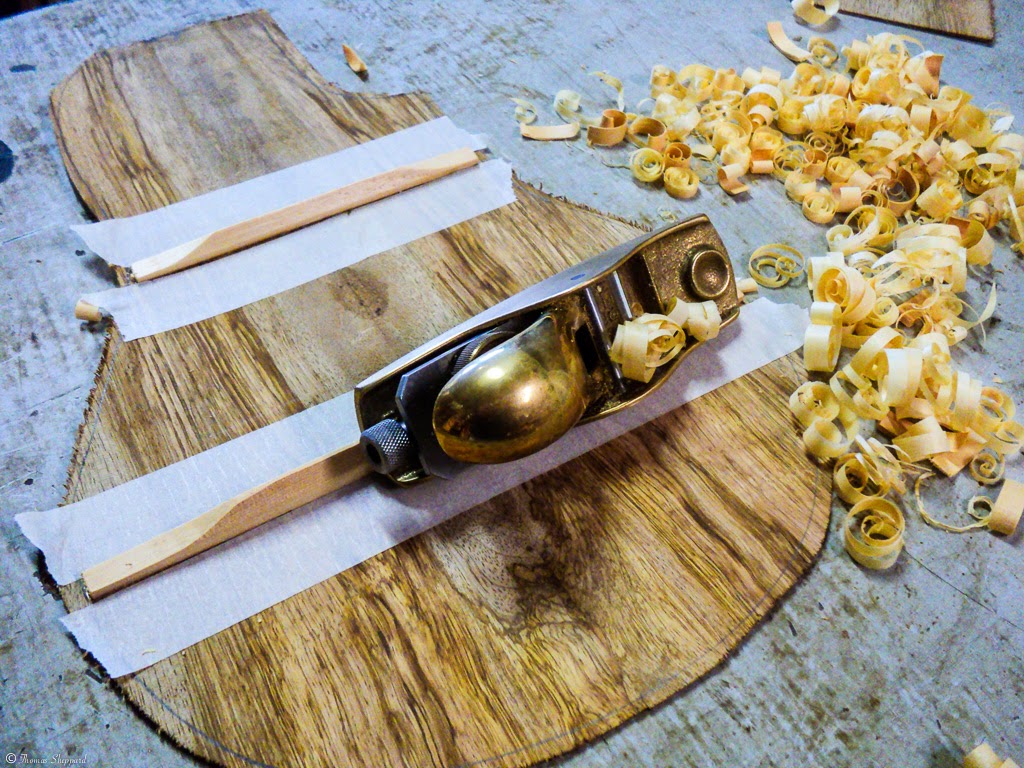

Once the ends are pared, I lay down some masking tape to protect the skin from damage by the edge of the block plane, before planing the cross bracing  to a ridge across its top.  The tape is then removed.


Now I glue the strengthening strip along the spine of the back.  This is cross grained timber to add strength to this join in the bookmatched pair that make up the back skin.  I am using the same mango timber that makes up the body - only the grain now runs at right angles to the grain of the back.
The ridged cross braces can now be clearly seen.
This is left to dry while I work on the front soundboard.

The Soundboard

The front of the uke - the soundboard - needs special attention in a specific order.
A re-inforcing patch is glued on the back of the sound hole before it is cut out,


This adds strength to this fragile area.
Here they are laid out before gluing.
I cut the sound hole with the rosette cutter that I have made previously.


Cross braces are added above and below the sound hole for the same reason.

Once these are dry I then add the fan braces that will stiffen the body of the front skin and provide the stiffness needed to carry the bridge.


In my next post, I'll lay out the parts made thus far to give an overview of the assembly to come.
Happy shavings to all

Wednesday, June 18, 2014

Making A Boat Paddle Tenor Ukulele - Part 8 - Making and Fitting the Body Linings

The Hall Table is finished and gone to a good home.
Soooo - back to the Uke.

The body of the ukulele is complete as far as the sides go, but it needs a neck block.


I have made the neck block from Australian Cedar for its lightness, strength and tonal qualities.


The neck block is over large - as this end of the uke is a weak point on a cutaway design.
The neck block is glued in place.

I have been refining the body and getting things ready for the application of the linings.  These hold the top and bottom in place when they are glued to the body sides.
I made the linings on the tablesaw from a piece of paulonia.


The kerfed timber was then cut into strips on the bandsaw.


The full story of making the linings can be found here:
http://thevillagewoodworker.blogspot.com.au/2012/06/building-ukulele-part-1-timber.html
I had made enough when I constructed my first ukulele, to have sufficient for a few more ukes.
The linings are held in place by clamps and pegs until the glue is dry.


This is done one side at a time, to allow the mould to support the body, and for it to project enough to apply the clamps.


Once  the top is done, the mould is flipped over and the process repeated for the bottom.


Inevitably there is excess glue that needs cleaning up, as well as any bumps from the linings that project above the edges.
This is easily attended to with a small block plane.
Enough for today.
Next time I'll look at the front and the back.
Happy shavings to all.


Wednesday, June 11, 2014

Building a Hall Table - Part 3 - Sanding and Finishing

Although the timber is dressed and finished, it is quite open grained and in parts the grain reverses or becomes more like end grain.
It requires sanding through all grades of grit from 100 to 400 before a series finishing coats is applied.

I started with a three part mix of 1/3 boiled linseed oil, 1/3 polyurethane and 1/3 mineral turpentine.
This really brought out the colour in the camphor laurel.

It takes ages to dry at the moment because of the colder weather and the extra humidity.

After several coats, with a very light sanding with 400 grit between coats, I finished it with straight polyurethane.
Here are some images of the finished result:


Hooray - all done.
Now to get back to my ukulele ......................

Wednesday, June 4, 2014

Making A Boat Paddle Tenor Ukulele - Part 7 - Neck Preparations

Long time no uke .....
Where were we?
OK, the body shell sides are  ready and glued in place.
The neck block has to be made to accommodate the neck tenon.
I have chosen Australian cedar for this because of its lightness and strength.
The neck block has to be moulded to fit the shape of the top end of the body - it will also support both the top and back of the uke.

Cutting Out The Neck

I have made up the neck blank from three strips - two of sassafras and one of Australian rosewood.


 One end is cut to leave the middle piece of rosewood.  This will act as the tenon to anchor the neck and body together.


Here is the neck roughly laid out on the laminated blank.


The angle of the headstock to the neck is 15 degrees - easily measured with a protractor and angle gauge


After laying out the neck shape precisely, I cut it out on the bandsaw.


Here are the offcuts and the roughed out neck.  I keep the scraps - they will come in handy later.
All of the remaining shaping of the neck will be done by hand using rasps, spokeshaves and scrapers.

I'll move on to that next.
Happy shavings

Monday, May 26, 2014

Building a Hall Table - Part 2

Commenced last post and progressing quickly.
Here is the piece of the slab that I have chosen for the top.


It has a natural edge for much of one side, and I propose to make this the leading edge, with the other long edge against the wall.


It will be held in place by buttons - these have been sawn from a scrap piece of camphor laurel, and will allow the table-top to move seasonally with wet and dry weather.


The finished and assembled table frame.  The legs are tapered on the insides and straight on their two outside faces.  This adds a look of some elegance - to my eye anyway :) .

Sanding through all grades of grit from 100 to 400 before a series finishing coats is applied.


Happy shavings to all.

Tuesday, May 20, 2014

Where Have You Been? Watcha Bin Doin' ..........

Holy macaroons Batman, doesn't the time fly when you are busy.
A short potted history for between my last post and this one -
  • house painting - outside
  • grandkids
  • renovations and repairs to the main bedroom and walk in robe
  • house painting - inside
  • travel
  • grandkids 
  • house painting - outside
  • re-building with my son, his garage
  • travel
  • grandkids
  • house painting - outside
  • uke
  • singing
  • travel
  • Hastings Woodworkers Guild
Where was I up to with those projects....................
The ukulele hasn't moved from its last known location and condition - still on the "to get finished" list.

I have begun a hall table for our Guild exhibition in a month and will document it here.

Building a Hall Table - Part 1

My good friend Terry gave me a couple of slabs of camphor laurel that he no longer needed, and I decided that one of them would contain enough timber for a hall table.
I laid it out and cut it before I thought to take a picture.
Here is what's left of the slab - not very impressive is it?


Here is a hint of its lovely colour:


Here's what it dresses like to reveal the multi coloured grain


I cut out the legs and the side rails and glued them in using mortice and tenon joints:


Here's a close up of the joint showing the completed side rail tenon in its mortice as well as the mortice for the front rail:


Here are all four legs with both side rails glued in place:


The front and back rails will have a strengthening cross piece let into housings.  Here I am cutting them with a tenon saw before chiseling out the waste.


Here is the completed cross member sitting in its housing as a trial fit:


Finally with all pieces ready here is a trial fit of front and back rails before glue up:


After glue up I'll work on the table-top.
Happy shavings to all
Tom

Monday, January 13, 2014

Making A Boat Paddle Tenor Ukulele - Part 6 - Sides + Front and Back

Okey-dokey, some time in the shed at last and getting back on track.

Sides
The moulded sides are well and truly dried and are holding their shape quite nicely.
The cutaway section is in two parts and needs some re-inforcing gussets to prevent chipping and to strengthen the joins.  I have chosen a couple of pieces of African blackwood, both for strength and because it matches both the fretboard and the headstock.


These two gussets will be glued in place before the linings are added to the inside.

Here is a view from the inside.


This end block will become the corner of the block that houses the neck.  It will be made from cedar for lightness and strength.
I'll cut a block from this piece of Australian cedar and I will also shape the mortice in it before gluing.  This so much easier to do while the cedar piece is long - it is also safer when using a router.


Gluing Up the Front and Back

The front and the back are made from book-matched thin (2mm) pieces of mango.
Before gluing, each piece has to have its glue-edge perfectly straight.  I do this with a plane on a shooting board.
This timber is not mango, but black wattle - but you get the idea.

The edge-trued pieces are glued together and held in place under tension by nothing more than masking tape.


A flat surface is placed on top to keep the drying skins from warping and this is held down with a small weight.

The finished results are shown with the mango skins dried and flat.


The skin on the left will be the front and that on the right will be the back.

 This skin is most highly figured of the two, and will look best on the back where it will be able to show off its lovely grain to advantage.
The other will have a sound hole cut into it as well as a bridge glued on top.


Finally I have cut some strips from what was left of the mango used for cutting the sides.  These strips will be used for bracing and strengthening pieces on the backs of the front and back skins.

Next time I'll work on the neck.