Holy Macaroons Batman!
I thought that retirement was that period in life when there was plenty of time to do just what we wanted to do.
I mustn't be doing it right - where do the days go?
Cutting Dadoes By Hand
The sides of the carcass will house the shelves, and these in dadoes. Commercial joineries would likely cut these on a table-saw or with a powered router. More fun by hand!
It is much easier to cut these before assembling the carcass, so let's get to it.
To maintain accuracy, both sides of the carcass should be aligned beside each other, and the measurements transferred to both at the same time.
I am using two shelves and they will be equidistant from top and bottom.
Measure the distance - inside top to inside bottom - and subtract the combined thickness of the two shelves. Divide this measurement by three, and we have the distance of each shelf from the top and the bottom respectively. The middle will look after itself.
After measuring and marking each piece in pencil, I like to scribe the marked lines with a marking knife. This does two things - it makes the marking easier to see, and severs the wood fibres along the edge of the dado.
After cutting out, the cleanup back to these lines will leave a crisp, clean cut.
Once again, I turn to my preferred tenon saw for this panel work. A brass backed Spear & Jackson - probably post WWII vintage - is such a pleasure to use in this situation. The handle is soooo comfortable - and look at that kerf!
After cutting inside the scribed lines, I remove the bulk of the waste with a bevelled edge Titan chisel. Cleanup is with a longer handled Japanese paring chisel that can reach right across the dado.
To clean out and even up the depth of the dado, I used a Stanley 71-1/2 hand router. Stanley made this and a 71, and there are similar hand routers by Sargent, Millers Falls, Record and Carter. A simple, yet elegant tool, and so easy to use - a sharp blade is a must
These dadoes are cut right through from the front of the carcass to the back. If the front edges of the side panels were to be visible, I would have stopped the dado short, but there will be a door frame at the front and a pair of stiles at the back - covering the dadoes completely.
Notice here, that all of the cutting is still inside the scribed lines. I'll work back to them next.
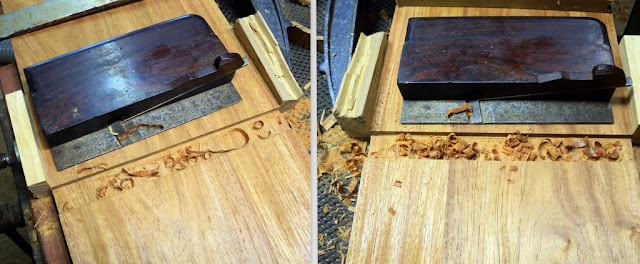
One of the most useful cabinet making tools that I own is this little side rebate plane. It was made years ago by an unknown craftsman, and is perfect for trimming back to the scribed lines of the dado.
Terry Gordon still makes two versions of this plane (left and right) and they can be seen HERE.
Because I'm cutting across the grain, the orientation of the side rebate doesn't matter. That is, I could use a left or right side rebate plane - mine is a right.
Since the wood fibres at the ends of the dado are fragile, they need to be protected from tearing away while using the side rebate plane. Here, I have clamped two scrap wood blocks to the edges, to prevent this from happening.
OK I am just about ready for carcass assembly.
One more thing for today. I will glue up the legs from three pieces of one inch stock, making some laminated blanks for later turning when they are dry. Going to be needing four of these. Might as well glue up the finishing top piece while I'm at it. Mouldings will sit under this on the finished top.
Better leave something for next time .......
.... and happy woodworking to all ...............


No comments:
Post a Comment