The neck glue-up passed without incident, and it is now ready to accept the fretboard.
The scale on my tenor ukulele is 17 inches. This determines the distance between the edge of the nut and the peak (break line) of the saddle.

With the soundboard temporarily in place, I can measure for the position of the bridge that carries the saddle. I do this before gluing the top onto the body, so that I have some room to clamp the bridge during its glue-up fitting. Too hard to do this after the top is fixed to the body.
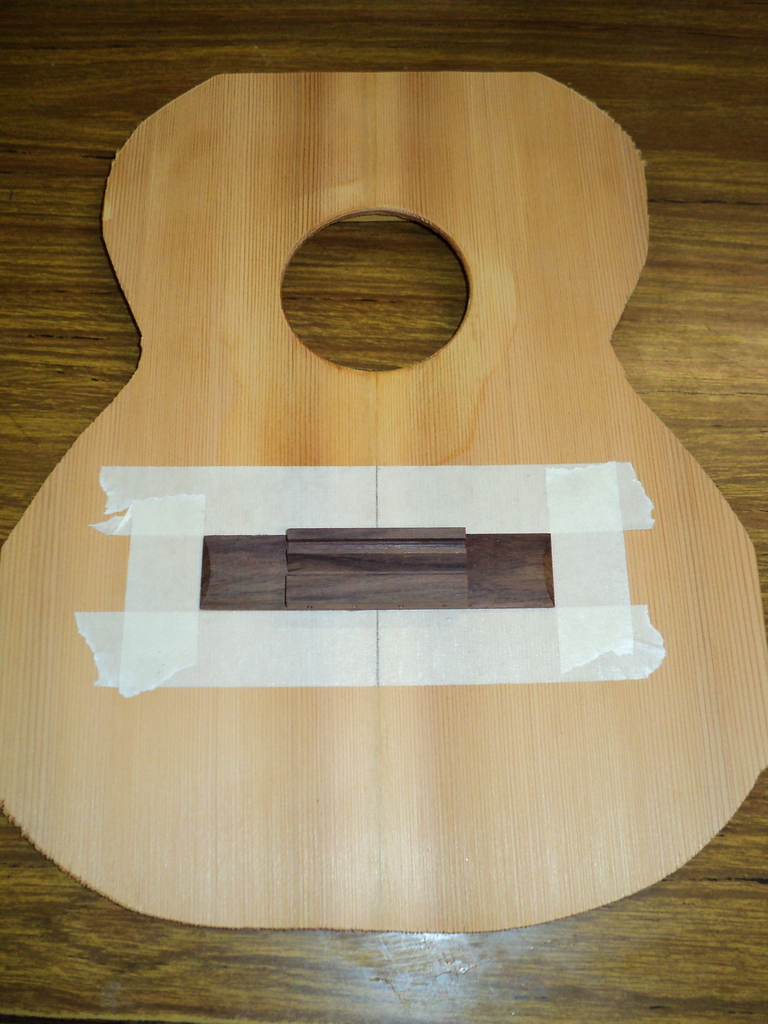
There will probably be glue squeeze out during this, so I mask off the area around the bridge with tape. This also acts as a good locator for the position of the bridge which is bound to slide around a bit on the glue.

Once done, the soundboard and bridge can be set aside to dry while I mark out the fretboard.

The positioning of the frets is critical, and the good folks over at Stewart MacDonald have provided a free-use fret position calculator - mucho gratias my friends.
Armed with a printout of my 17 inch scale for 18 frets, I am good to go.
These have to be marked on the squared fretboard before tapering it, so that the fret positions are easily done with a try square. It is more accurate to use a marking knife for the fret marking, as it minimises the inaccuracies of pencil thickness.

The fret positions should all be marked from the edge of the nut, and not marked in increments from the previous fret mark. Doing it the second way only multiplies any inaccuracy with every fret mark.
So, the ruler is clamped to the fretboard and all marks laid out before scribing them. I have carefully ticked off all the fret marks as I go, to ensure I didn't miss any.

I'll cut them next, before tapering the fretboard to suit the neck that I have already built.

Now, the fretwires themselves have a very narrow seat, and so a very narrow-kerfed bladed saw is needed. I tried several of my saws, before finding that my Veritas dovetail saw is just about perfect - narrow kerf, and very little set on the teeth. It is a rip saw of course, designed for cutting dovetails along the grain, but serves very nicely as a crosscut saw in this instance.

To help with the saw cuts and to keep them on track, I made up a little square saw guide.
Works a treat.
Got to wait a little, while glue dries.
Next time, I'll attach the top - and after that sets, I'll fix the fretboard.
Nearly finished - yippee ....................
Still got some time left for some strummin' practice -
Uke group night tonight - FUN!
Love life and live .........................
Here's me thing poor Tom all laid up feeling sorry for himself so I decided to wait a week or two til I checked his progress. I am amazed how far you've got Tom.
ReplyDeleteAs for the shoulder Ouch....
.....I got my just deserts/karma Saturday week gone. I got thrown out head first of the wheelchair front wheel went down into sand it stopped I didn't. Shoulders and back giving me heck since, double dose of Penadol Ostio for last 3 days. Still in the shed turning another 3 tier can't put photo's up its a surprise so when its all done I will. Shed smells of Huon :)
By the looks of things by next week you'll be strumming along at Uke group.
Thanks Ray.
DeletePhysio has been great for the shoulder - doesn't ouch when I strum, just cant do much past my side yet. I have been pleased to get a little more done on the uke as a result.
Maybe by next week it will be together, then I'll try to address the finishing.
You don't sound too flash though. What were you thinking - murder ball?
You are supposed to watch it on the para-olympics, not take part yourself.
Get well my friend.
Tom
It's gonna be a nice uke that. But I would suggest that fro the next one, you do things in a slightly different order. I would have glued the top on first, with the soundhole cut. Then attached the neck, and after that the back. Then fretboard and lastly the bridge. It really good to place the bridge sideways after the fretboard is in place. I made a blog post about my procedure, find it here: http://www.argapa.blogspot.se/2012/05/glueing-bridge-argapa-stylee.html
ReplyDeleteBut as I said, it's gonna be a nice one. Very good for a first uke.
Good luck / Sven
Many thanks Sven.
ReplyDeleteI'll look carefully at your blog posts - much appreciated.
I thought about putting the bridge on after the top, but couldn't figure out a way to accomplish it.
I am pleased with the progress I have made, but have this fear that after all is done, it may still sound like a brick with a rubber band on it.
We'll see.
Cheers for now
Tom
I have had a chance to view your blog Sven, and I can see definite advantages in your order of assembly. I didn't know about those long clamps and I could think of no other way of attaching the bridge, so I went down the path that I did.
DeleteInterestingly, I thought that my masking tape idea was original until I saw what you had done.
I may have some issues with saddle and fret heights - we'll see.
Cheers
Tom
I'm following your build with great interest. Really like the neck to body joint. Hope to be a builder in the near future. What glue do you use?
ReplyDeleteEd Miller
Hi Ed,
Deletethanks for the kind words. For the neck to body joint as well as the top and bottom glue-ups (and bridge to top), I am using a two part epoxy called Techniglue. For everything else, simply PVA.
I have my fingers crossed on these, and am really hopeful that the finished sound is going to be good.
You will enjoy building a uke - lots of fun.
Cheers for now.
Tom