Any woodworker who has been pursuing their craft for a long time can reach a point when things seem repetitive or boring. This feeling is, of course, not restricted to woodworking - but it is in this context that I write.
I have seen passionate woodworkers lose their muse from time to time, and drift off into a kind of woodworking limbo where both inspiration and motivation begin to flag.
This kind of malaise is seldom found among members of groups who share their interests with each other.
As a member of the Hastings Woodworkers Guild, I see - every day - the benefits of belonging to a community of like minded souls. Techniques are shared, efforts are encouraged, successes are acknowledged, ways to improve are suggested.
Moreover there is available in the collective wisdom of the group, answers to problems and different ways of approaching thorny assignments.
Members with expertise often give of their time to demonstrate and teach technique.
Here, John demonstrates how easy it is to cut and re-join bandsaw blades.
These blades are cast offs from the local butcher shop. They are discarded when they no longer are able to cut bone. Interestingly, they are still sharp enough to easily slice through timber, and we get more than 6 months out of a re-sized throw-away blade before it needs replacing.
The re-sizing is necessary to reduce the blade in length to fit our standard 14 inch bandsaws.
Groups like ours often hold "Show and Tell" times where members' work can be displayed.
Most importantly, members are acknowledged, their work valued, and their presence appreciated.
And then, of course, there are the conundrums........................
................. the impossible dovetail ..........................
and ..........
................... the impossible housing joint ................
On top of this, the icing on the cake is the sense of community and belonging that members feel, as well as friendships that grow through contact and shared experiences.
If you ever find your woodworking spirits starting to sag, and your inspiration beginning to shrink - maybe a group like this one, can turn things around.
Happy trails pardners.................
Life in the Village and beyond, based around the interests of my life.
Life in the Village and beyond, based around the interests of my life. Sunset at Telegraph Point.
Saturday, June 22, 2013
Monday, June 3, 2013
Absence Makes The Heart Grow Fonder
I have been away for the last month or so, and in traveling the outback, there isn't much in the way of internet coverage.
It was a wonderful trip in the company of my sister, her friend Judy and the LOML.
Woodworking has had to take a back seat for the immediate past, but I am thrilled to be back.
The trip home again from Brisbane mandated another visit to Bangalow, and Heath's Old Wares.
Yes - I know - I'm weak.
I dug around the saws bin again for another bargain, and came up with two saws that were exceptional.
One was a little 10 point Disston panel saw in rusting condition, but otherwise excellent. The handle was superb. Sadly, when I tried to buy it, I was given the third degree on where did I find it ............
Turns out it was Heath's own saw, that his wife had mistakenly "put away" in the sales bin. Ho-hum.
No sale there - lucky for Heath and unlucky for me....................
Sandvik Hand Saws - Woodworking's Best Kept Secret
.................the other saw is a lovely little Sandvik.
While woodworkers all value Disston, Atkins, Simmonds, Tyzack, Spear & Jackson and other well known hand saw marques, few acknowledge the excellence of the Sandvik offerings.
This one is a 23 inch 8PPI panel saw, cross cut of course.
Sandviks also come with a blue handle, and they are often dismissed as not as good as other handsaws because they are judged on their handles alone. For this reason, they are almost always cheap - really cheap for what they are.
I am not a fan of plastic handles as they can become slippery when sweated upon, in the course of cutting, and they don't accommodate my three fingered grip very well - but this one is at least tolerable in its ergonomics.
What Sandviks miss out on in the handle department, is more than made up for everywhere else.
It's Sandvik's blades that make them special. The steel is exceptional, and they cut like a hot knife through butter.
This one is breasted - the slight convex curve that runs the length of the cutting edge. The rust is only on the surface, with no pitting to contend with.
This saw will clean up beautifully, and make a great general-purpose cross cut saw for small projects. It will also be a suitable stable mate to its bigger brother - used in the last post (see below).
Sandvik Saws were made in Sweden and the blades are taper ground. They are renowned for their edge keeping qualities among those who know of their worth.
Prior to rust removal here is a comparison of sizes with my current X-cut saw:
First step - remove the handle:
One obvious sign of the quality of these saws is the use of heavy duty brass handle screws. It is easy to dismiss these saws on first appearance because of their plastic handle. It's only when we look a little deeper that the quality appears.
Easy to see here what the original saw blade looked like, and the accuracy of the mating holes in the saw plate.
When I rust-clean, I use a wire brush on my old Makita grinder. It doesn't hurt the sawplate - the steel is much too hard for that. I do it outside, as there is a fair bit of rust-dust generated, and it is a dirty job.
Once the steel has had its rust and grime removed, it's time to wipe off the black detritus generated by the cleaning process. I oil the blade at the same time with camelia tea oil. The old rag shows how dirty the remaining residue can be.
Next step will be off to the saw doc to have the teeth sharpened and set.
The teeth need setting only at the point and not from the base - there is an etch from a Sandvik saw here that explains it.
The steel in these old Sandviks is harder than the Disstons that I am used to, and the teeth are prone to snapping unless the blade is warmed first before setting. I'll leave that step to Dr. John.
Here are the two saws together. Nice couple aren't they.
Can't wait to use them again.
So if you ever see one of these in the wild, and you don't mind using a saw with one of these handles, you will be rewarded with the joy of a premium tool for the price of McValue meal.
They really are that good.
For now - it's just so good to be back........
Adios Amigos................
It was a wonderful trip in the company of my sister, her friend Judy and the LOML.
Woodworking has had to take a back seat for the immediate past, but I am thrilled to be back.
The trip home again from Brisbane mandated another visit to Bangalow, and Heath's Old Wares.
Yes - I know - I'm weak.
I dug around the saws bin again for another bargain, and came up with two saws that were exceptional.
One was a little 10 point Disston panel saw in rusting condition, but otherwise excellent. The handle was superb. Sadly, when I tried to buy it, I was given the third degree on where did I find it ............
Turns out it was Heath's own saw, that his wife had mistakenly "put away" in the sales bin. Ho-hum.
No sale there - lucky for Heath and unlucky for me....................
Sandvik Hand Saws - Woodworking's Best Kept Secret
.................the other saw is a lovely little Sandvik.
While woodworkers all value Disston, Atkins, Simmonds, Tyzack, Spear & Jackson and other well known hand saw marques, few acknowledge the excellence of the Sandvik offerings.
This one is a 23 inch 8PPI panel saw, cross cut of course.
Sandviks also come with a blue handle, and they are often dismissed as not as good as other handsaws because they are judged on their handles alone. For this reason, they are almost always cheap - really cheap for what they are.
I am not a fan of plastic handles as they can become slippery when sweated upon, in the course of cutting, and they don't accommodate my three fingered grip very well - but this one is at least tolerable in its ergonomics.
What Sandviks miss out on in the handle department, is more than made up for everywhere else.
It's Sandvik's blades that make them special. The steel is exceptional, and they cut like a hot knife through butter.
This one is breasted - the slight convex curve that runs the length of the cutting edge. The rust is only on the surface, with no pitting to contend with.
This saw will clean up beautifully, and make a great general-purpose cross cut saw for small projects. It will also be a suitable stable mate to its bigger brother - used in the last post (see below).
Sandvik Saws were made in Sweden and the blades are taper ground. They are renowned for their edge keeping qualities among those who know of their worth.
Prior to rust removal here is a comparison of sizes with my current X-cut saw:
First step - remove the handle:
One obvious sign of the quality of these saws is the use of heavy duty brass handle screws. It is easy to dismiss these saws on first appearance because of their plastic handle. It's only when we look a little deeper that the quality appears.
Easy to see here what the original saw blade looked like, and the accuracy of the mating holes in the saw plate.
When I rust-clean, I use a wire brush on my old Makita grinder. It doesn't hurt the sawplate - the steel is much too hard for that. I do it outside, as there is a fair bit of rust-dust generated, and it is a dirty job.
Once the steel has had its rust and grime removed, it's time to wipe off the black detritus generated by the cleaning process. I oil the blade at the same time with camelia tea oil. The old rag shows how dirty the remaining residue can be.
Next step will be off to the saw doc to have the teeth sharpened and set.
The teeth need setting only at the point and not from the base - there is an etch from a Sandvik saw here that explains it.
The steel in these old Sandviks is harder than the Disstons that I am used to, and the teeth are prone to snapping unless the blade is warmed first before setting. I'll leave that step to Dr. John.
Here are the two saws together. Nice couple aren't they.
Can't wait to use them again.
So if you ever see one of these in the wild, and you don't mind using a saw with one of these handles, you will be rewarded with the joy of a premium tool for the price of McValue meal.
They really are that good.
For now - it's just so good to be back........
Adios Amigos................
Wednesday, May 1, 2013
Small Projects - A Mobile TV Table
Part One - Layout, Cutting and Preparing Joints
Yes, I know that I am a hand tool neanderthal, and I really love using them. I also still have a yen for manually focused SLR lenses too, but that is another story. Folks are sometimes surprised to find that I occasionally watch television, and yes there is a small TV in the back room so that the grand-kids can watch Kung-Fu Panda and the Ice Age series.
Thing is, the back room is used for so many tasks - sewing, spare bedroom in a pinch, the retreat that provides a quantum of solace when the house is hectic, as well as that place that all the lego can be left out for days while imaginative building projects take shape and form - and games are invented around the masterpieces of construction.
So the TV has to be movable - and it should be small enough to push out of the way when the kingdoms of imagination need room to grow.

A low be-castored table is my answer to this conundrum.
The LOML wants timber that is light in colour, so no rosewood or Australian cedar thanks very much. I love working with camphor laurel, but no, something more plain this time.
I have found a plank of tea tree that will serve well. I've never worked with this timber before, and I am interested to see how it responds to my tools and my patience.
This plank is straight from Mal Ward's Botique Timbers, and is still fairly rough.
First step is to mark out what will be the various parts of this simple construction.
The plank is far too large to be cut with my power tools, and anyway I love a chance to use a good handsaw.
This is a lovely "old" Sandvik, so beloved of my cousin David, who swears by them. I am not too fussed on the plastic handle, but he is right about the saw - it went through this hard timber like a hot knife through butter. Note the kerfs from both edges meeting in the middle - to stop the weight of the plank splintering the edge.
Next step is to true up one edge as a reference for all the further cutting that will be necessary. First - the trusty Carter number 5 jack plane to remove all the rough and unruly parts of the edge. Finish up with a Lie Nielsen low angle jack. If the pieces were longer I would have reached for the Stanley number 7 or 8, but this time a number 5 will suffice. Lie Nielsen uses American cherry for their handles - it is amazing how dark this timber can become as it ages. Compare mine to a new plane handle here.
This little table will have an open front, two sides, a shelf and a top - all braced by a partial back that leaves room for the cables and power cord. Joints between the various parts will be partially housed and will have through tenons, to add a touch of Greene and Greene to the design.
The top is a straight rectangle. Both sides, the back and the shelf will all have tenons cut which will project through the panel that each will interface with. Sounds complicated, but it's not.
Here is the shelf. It will have two through tenons at each end, and a short (3/16") stub tenon between them that will sit in a shallow housing. The stub tenon can be seen marked in this image and the first picture below.
The second image above shows the cut after the corner of the shelf has been removed. I cut just inside the line and will pare back to the line with a paring chisel.
I did this, as this edge sits flush with the side and I wanted to avoid saw splintering here, and there is no housing at the front (or the back) to spoil the line of the front edge of each side panel. Hope that makes sense - if not, keep watching and you'll see what I mean.
Before cutting down the grain, I often line up the workpiece so that it is square to the vice - helps keep the saw cut straight.
Since the cut is essentially a ripping cut along the grain, a rip dovetail saw works best. This is a little Lie Nielsen 15PPI that works very well.
Paring the endgrain back to the scribed line takes a sharp chisel. This one does the trick.
Cutting out the waste between the two through tenons can be done easily with a coping saw. A jigsaw or a bandsaw would be quicker, but we're not in a hurry today. Notice that I am only cutting down to the level of the stubby tenon that will sit inside the housing. Not too fussed on cleaning this up with a paring chisel, as this will not be seen.
Cutting out the corners means sawing across the grain. I was lazy and tried the dovetail saw, which sometimes works OK. Not this time. The timber has all sorts of swirling grain and the rip dovetail saw kicked and bucked like a mule. The tenon saw handled it easily. This is a Tyzack.
Here is the finished shelf. Notice the through-tenons at each end.
The back will look almost the same - just smaller.
The two sides will have through tenons only at the top..
I'll get those done next time, as well as cutting the through-mortices and the housings.
Happy shavings to all.
Yes, I know that I am a hand tool neanderthal, and I really love using them. I also still have a yen for manually focused SLR lenses too, but that is another story. Folks are sometimes surprised to find that I occasionally watch television, and yes there is a small TV in the back room so that the grand-kids can watch Kung-Fu Panda and the Ice Age series.
Thing is, the back room is used for so many tasks - sewing, spare bedroom in a pinch, the retreat that provides a quantum of solace when the house is hectic, as well as that place that all the lego can be left out for days while imaginative building projects take shape and form - and games are invented around the masterpieces of construction.
So the TV has to be movable - and it should be small enough to push out of the way when the kingdoms of imagination need room to grow.
A low be-castored table is my answer to this conundrum.
The LOML wants timber that is light in colour, so no rosewood or Australian cedar thanks very much. I love working with camphor laurel, but no, something more plain this time.
I have found a plank of tea tree that will serve well. I've never worked with this timber before, and I am interested to see how it responds to my tools and my patience.
This plank is straight from Mal Ward's Botique Timbers, and is still fairly rough.
First step is to mark out what will be the various parts of this simple construction.
The plank is far too large to be cut with my power tools, and anyway I love a chance to use a good handsaw.
This is a lovely "old" Sandvik, so beloved of my cousin David, who swears by them. I am not too fussed on the plastic handle, but he is right about the saw - it went through this hard timber like a hot knife through butter. Note the kerfs from both edges meeting in the middle - to stop the weight of the plank splintering the edge.
Next step is to true up one edge as a reference for all the further cutting that will be necessary. First - the trusty Carter number 5 jack plane to remove all the rough and unruly parts of the edge. Finish up with a Lie Nielsen low angle jack. If the pieces were longer I would have reached for the Stanley number 7 or 8, but this time a number 5 will suffice. Lie Nielsen uses American cherry for their handles - it is amazing how dark this timber can become as it ages. Compare mine to a new plane handle here.
This little table will have an open front, two sides, a shelf and a top - all braced by a partial back that leaves room for the cables and power cord. Joints between the various parts will be partially housed and will have through tenons, to add a touch of Greene and Greene to the design.
The top is a straight rectangle. Both sides, the back and the shelf will all have tenons cut which will project through the panel that each will interface with. Sounds complicated, but it's not.
Here is the shelf. It will have two through tenons at each end, and a short (3/16") stub tenon between them that will sit in a shallow housing. The stub tenon can be seen marked in this image and the first picture below.
The second image above shows the cut after the corner of the shelf has been removed. I cut just inside the line and will pare back to the line with a paring chisel.
I did this, as this edge sits flush with the side and I wanted to avoid saw splintering here, and there is no housing at the front (or the back) to spoil the line of the front edge of each side panel. Hope that makes sense - if not, keep watching and you'll see what I mean.
Before cutting down the grain, I often line up the workpiece so that it is square to the vice - helps keep the saw cut straight.
Since the cut is essentially a ripping cut along the grain, a rip dovetail saw works best. This is a little Lie Nielsen 15PPI that works very well.
Paring the endgrain back to the scribed line takes a sharp chisel. This one does the trick.
Cutting out the waste between the two through tenons can be done easily with a coping saw. A jigsaw or a bandsaw would be quicker, but we're not in a hurry today. Notice that I am only cutting down to the level of the stubby tenon that will sit inside the housing. Not too fussed on cleaning this up with a paring chisel, as this will not be seen.
Cutting out the corners means sawing across the grain. I was lazy and tried the dovetail saw, which sometimes works OK. Not this time. The timber has all sorts of swirling grain and the rip dovetail saw kicked and bucked like a mule. The tenon saw handled it easily. This is a Tyzack.
Here is the finished shelf. Notice the through-tenons at each end.
The back will look almost the same - just smaller.
The two sides will have through tenons only at the top..
I'll get those done next time, as well as cutting the through-mortices and the housings.
Happy shavings to all.
Tuesday, April 9, 2013
Backsaws For Woodworking - A Practical Introduction
Backsaws are particularly useful in the workshop, especially in furniture making and fine woodworking. Of all of the various types of backsaw, the most useful for me is the humble tenon saw.
These are usually filed so that the teeth are a cross-cut pattern, and they get used for much more than cutting tenons.
I find them indispensable in box making and carcass work as well.
Here are two of my favourite old tenon saws. At the top is a Colver Brosler 14 inch 12 PPI, and below it a Taylor Brothers 14 inch 11 PPI.
The handles are works of art, and fit the hand beautifully - decades of being handled have smoothed these, and added the patina that sweat and workshop dust combined to form in use. The blades are better than they look - there is dried tea-oil across them as a rust deterrent, and it looks a little patchy in pictures.
Of course tenon saws are initially designed for cutting tenons, but they are even more versatile than just that.
Sometimes they come in canted blade versions like this smaller 12 inch Taylor Brothers brass backed saw. This one has 12PPI. The canted blade allows me easier sighting to the end of the cut, and is especially useful when cutting dados.
I'll include a picture of my much more recent Spear and Jackson cutting dados - I haven't one handy using the Taylor.
Tenon saws are the workhorses of the woodshop, and I find it useful to have more than one. The most common sizes that I use the most, have 11 or 12 PPI.
Less commonly used - by me, at any rate - is a dovetail saw. I don't cut a lot of dovetails, and if there are a lot to do, I will use a router and a jig to save time. However, small projects like boxes, small cabinets and trays etc warrant hand cutting, as the dovetails can be finished by the time the jig is set up and tested.
This lovely example was made by Ian Wilkie and has a walnut handle. Ian has written a wonderful article on backsaws in this month's - issue 78 - Australian Wood Review.
It is a 10 inch saw with 15 PPI and a fine kerf, and being a dovetail saw, is filed rip - for cutting along the grain. Ian's work is stunning.
It is also useful for fine work and doubles as a crosscut saw in a pinch.
The standard go-to handsaw for panel work in my workshop is a 10 PPI Disston. The blade on mine has some spotting, but it is well away from the cutting edge. In spite of its looks this is a sweet little saw, and a joy to use.
In the past, when long dados were to be cut, I have used the 10 point panel saw, as I had nothing else. Recently I found a Spear and Jackson 10 point large tenon saw - for the odd occasion that large dados present. It has an 18 inch blade, and is so much easier to use and keep straight in the cut, than was the panel saw in this case. The number of times I cut long housings is infrequent, so this saw will outlast me and my grandchildren I expect. It has certainly seen little use over its life.
Not, technically a backsaw - (of course not - DOH!), but so useful none-the-less, is a little flush cut saw. I use this a lot in repairs to furniture, and it is superb at trimming broken dowels and fractured tenons. These are made with one flat side on the blade and a set on the teeth of the other. It leaves a smooth surface on the face of the timber, and cuts off the offending projection, flush with the surface.
The blade is flexible so that the handle can clear the surface when cutting.
Finally, I should mention a long backsaw, for cross cutting mitres and other angles. These are used in a mitre box, and are much safer for cutting short pieces than using an electric dropsaw or SCMS.
This saw is long at 24 inches, and is an 11 PPI saw for general work. Even though it is a long back saw, it uses a lot of its length just staying in the mitre box, leaving not too much to do the cutting. An even longer saw would be ever more useful here in my opinion.
This one is a Warranted Superior - probably by Disston.
These are usually filed so that the teeth are a cross-cut pattern, and they get used for much more than cutting tenons.
I find them indispensable in box making and carcass work as well.
Here are two of my favourite old tenon saws. At the top is a Colver Brosler 14 inch 12 PPI, and below it a Taylor Brothers 14 inch 11 PPI.
The handles are works of art, and fit the hand beautifully - decades of being handled have smoothed these, and added the patina that sweat and workshop dust combined to form in use. The blades are better than they look - there is dried tea-oil across them as a rust deterrent, and it looks a little patchy in pictures.
Of course tenon saws are initially designed for cutting tenons, but they are even more versatile than just that.
Sometimes they come in canted blade versions like this smaller 12 inch Taylor Brothers brass backed saw. This one has 12PPI. The canted blade allows me easier sighting to the end of the cut, and is especially useful when cutting dados.
I'll include a picture of my much more recent Spear and Jackson cutting dados - I haven't one handy using the Taylor.
Tenon saws are the workhorses of the woodshop, and I find it useful to have more than one. The most common sizes that I use the most, have 11 or 12 PPI.
Less commonly used - by me, at any rate - is a dovetail saw. I don't cut a lot of dovetails, and if there are a lot to do, I will use a router and a jig to save time. However, small projects like boxes, small cabinets and trays etc warrant hand cutting, as the dovetails can be finished by the time the jig is set up and tested.
This lovely example was made by Ian Wilkie and has a walnut handle. Ian has written a wonderful article on backsaws in this month's - issue 78 - Australian Wood Review.
It is a 10 inch saw with 15 PPI and a fine kerf, and being a dovetail saw, is filed rip - for cutting along the grain. Ian's work is stunning.
It is also useful for fine work and doubles as a crosscut saw in a pinch.
The standard go-to handsaw for panel work in my workshop is a 10 PPI Disston. The blade on mine has some spotting, but it is well away from the cutting edge. In spite of its looks this is a sweet little saw, and a joy to use.
In the past, when long dados were to be cut, I have used the 10 point panel saw, as I had nothing else. Recently I found a Spear and Jackson 10 point large tenon saw - for the odd occasion that large dados present. It has an 18 inch blade, and is so much easier to use and keep straight in the cut, than was the panel saw in this case. The number of times I cut long housings is infrequent, so this saw will outlast me and my grandchildren I expect. It has certainly seen little use over its life.
Not, technically a backsaw - (of course not - DOH!), but so useful none-the-less, is a little flush cut saw. I use this a lot in repairs to furniture, and it is superb at trimming broken dowels and fractured tenons. These are made with one flat side on the blade and a set on the teeth of the other. It leaves a smooth surface on the face of the timber, and cuts off the offending projection, flush with the surface.
The blade is flexible so that the handle can clear the surface when cutting.
Finally, I should mention a long backsaw, for cross cutting mitres and other angles. These are used in a mitre box, and are much safer for cutting short pieces than using an electric dropsaw or SCMS.
This saw is long at 24 inches, and is an 11 PPI saw for general work. Even though it is a long back saw, it uses a lot of its length just staying in the mitre box, leaving not too much to do the cutting. An even longer saw would be ever more useful here in my opinion.
This one is a Warranted Superior - probably by Disston.
For fine work, a smaller saw - around 15 PPI - and a wooden mitre jig are more useful.
Backsaws are real joinery workhorses, and a necessity for fine work. The fact that they are a pleasure to use is an added bonus.
Happy shavings to all .........................
Monday, March 4, 2013
The Little Carport That Could
Turning A Carport Into A Multi Use Room
Years ago when we first bought our old cabin in the woods, we had all of our five teenage children at home, and not enough rooms to give them all some privacy.
The old home had a carport off the end of the house, where the car barely fitted because of what else was stored under there.
At the other end from the family chariot, was some space that we used to store boxes (and other stuff) before they were unpacked, and a place found for the contents.
We had inherited another old shed - of sorts - that defied gravity and the best attempts of mother nature to bring it down.
So, after we had found a home for all the goods and chattels that occupied the carport, it was time to turn it into a live-able room. I built this in my spare time, and was lucky to already have the roof in place.
Once the supporting framework of the stud walls was added, the steel posts that had supported the roof were removed. They were re-used for a back verandah on the northern side of the house. I built it later.
The two windows shown here were taken out, and became a double window along the short side of the room, while I sourced some other timber-frame windows for the long wall.
The first window space became a door between the rooms, and the second was covered completely when the interior was lined.
All the exterior log linings were re-used on the new exterior walls.
An access ramp was added a little later, and this was covered with a narrow verandah roof.
Being in a hurry to get the room ready for occupation, it was lined inside, but the ceiling - of tongue and groove boards - was never ever painted.
Until now.
Years of exposure outside had darkened and weathered the timber. In our advancing years, with our eyesight not what it was, the LOML suggested that a coat of paint might not only brighten things up, but also help us to see better when we use this room.
Did I say - we - you all know what I mean though, don't you.
Because of the immutable law that says that we will fill whatever space is available to us, and the fact that we are expecting family guests this weekend, the furniture etc has to stay in the room while I paint around it.
It is being done in two halves.
It doesn't look like it because of the wide angle lens used for the picture........ but.......
The far end (half the room) is finished, while the half nearest is 3/4 undercoated, with one panel left to do.
This is all brush work, and involves lots of looking up with a bent neck.
You can see what the original timber lining boards looked like before undercoating.
And the finished colour at the far end isn't too shabby.
Hope she's happy..................
................... I know I am.
Happy woodworking to all.
Years ago when we first bought our old cabin in the woods, we had all of our five teenage children at home, and not enough rooms to give them all some privacy.
The old home had a carport off the end of the house, where the car barely fitted because of what else was stored under there.
At the other end from the family chariot, was some space that we used to store boxes (and other stuff) before they were unpacked, and a place found for the contents.
We had inherited another old shed - of sorts - that defied gravity and the best attempts of mother nature to bring it down.
So, after we had found a home for all the goods and chattels that occupied the carport, it was time to turn it into a live-able room. I built this in my spare time, and was lucky to already have the roof in place.
Once the supporting framework of the stud walls was added, the steel posts that had supported the roof were removed. They were re-used for a back verandah on the northern side of the house. I built it later.
The two windows shown here were taken out, and became a double window along the short side of the room, while I sourced some other timber-frame windows for the long wall.
The first window space became a door between the rooms, and the second was covered completely when the interior was lined.
All the exterior log linings were re-used on the new exterior walls.
An access ramp was added a little later, and this was covered with a narrow verandah roof.
Being in a hurry to get the room ready for occupation, it was lined inside, but the ceiling - of tongue and groove boards - was never ever painted.
Until now.
Years of exposure outside had darkened and weathered the timber. In our advancing years, with our eyesight not what it was, the LOML suggested that a coat of paint might not only brighten things up, but also help us to see better when we use this room.
Did I say - we - you all know what I mean though, don't you.
Because of the immutable law that says that we will fill whatever space is available to us, and the fact that we are expecting family guests this weekend, the furniture etc has to stay in the room while I paint around it.
It is being done in two halves.
It doesn't look like it because of the wide angle lens used for the picture........ but.......
The far end (half the room) is finished, while the half nearest is 3/4 undercoated, with one panel left to do.
This is all brush work, and involves lots of looking up with a bent neck.
You can see what the original timber lining boards looked like before undercoating.
And the finished colour at the far end isn't too shabby.
Hope she's happy..................
................... I know I am.
Happy woodworking to all.
Friday, March 1, 2013
The Disston Number 9 Backsaw - A Lucky Find
My hometown is Brisbane, and we often travel there - as I have oceans of family in that lovely city.
On one of our recent trips, we were making good time, so we planned a late lunch and pulled off the highway into the little hamlet of Bangalow.
There is a particular park that has been a stopping spot for us for decades.
Well, on this occasion, the town was busy - no car parks anywhere - not even down by the old railway station.
We drove around and around before spotting a vacancy at the bottom of the hotel carpark.
For Patrons Only didn't worry us, as we were going inside to order drinks in any case.
Unknown to us all these years, was the fact that we had parked next to the back gate of HEATH'S OLD WARES & COLLECTABLES
After lunch the emporium begged us to go see.
heathsOldWaresCounter.jpg
Apart from having cornered the market in old wooden ladders, Heath had aisles full of wonders.
It was down this next aisle that I discovered a milk churn full of saws:
aisle1HeathsOldWaresBangalo.jpg
And among these saws there was this:
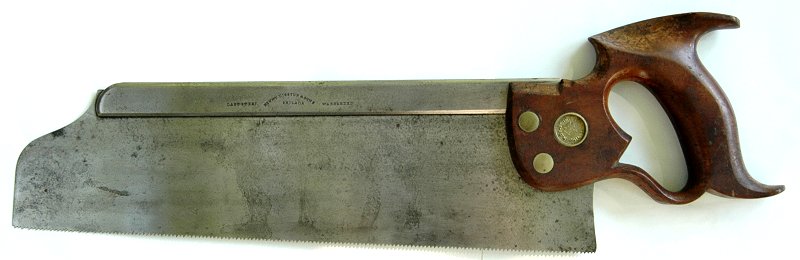
Needless to say, it didn't look this good at the time, and it has had a set and a sharpen since, but it was an unmistakable Disston Number 9 Backsaw.
The handle was complete, with no cracks or chips out of the spurs.
Even the brass saw nuts were in good shape.
The blade was straight and had only the slightest suggestion of rust dimpling.
This was a must have!
A quick check of my wallet showed that the moths had long ago vacated, and I was in the position of convincing my beloved of what an awesome buy this was, and could she go find an ATM while I guarded this piece of royalty of the sawmaker's art.
Long story short - it travelled with us to Brisbane, where I bored every one of my relatives who had not already been warned to avoid me, on what a miraculous find this had been, and how hard it was to find one of these in the wild. Maybe they are common somewhere, but this is the first that I have seen in thirty years of sniffing out old tools.
There is a little more on Disston Backsaws HERE.
no9saw.jpg
I have now more backsaws than I regularly use and a cull is in order.
It has prompted me to consider for my next BLOG post a small presentation on Backsaws from the perspective of usefulness.
Stay tuned.
In the meantime I am one happy little vegemite.
Interestingly, Peter has responded to this post with an application for a patent by William J Reagan, issued on December 8 1874 for an Improvement in Handles for Saws, that contains the recess for the thumb.
The inventor thought that this same improvement could be added to other tool handles such as those on planes.
The link can be found here:
Patent number: 157634 Filing date: Nov 14, 1874 Issue date: Dec 8, 1874
Many thanks Peter.
NOTE: - All images used from other websites are acknowledged under each image.
On one of our recent trips, we were making good time, so we planned a late lunch and pulled off the highway into the little hamlet of Bangalow.
There is a particular park that has been a stopping spot for us for decades.
Well, on this occasion, the town was busy - no car parks anywhere - not even down by the old railway station.
We drove around and around before spotting a vacancy at the bottom of the hotel carpark.
For Patrons Only didn't worry us, as we were going inside to order drinks in any case.
Unknown to us all these years, was the fact that we had parked next to the back gate of HEATH'S OLD WARES & COLLECTABLES
After lunch the emporium begged us to go see.
heathsOldWaresCounter.jpg
Apart from having cornered the market in old wooden ladders, Heath had aisles full of wonders.
It was down this next aisle that I discovered a milk churn full of saws:
aisle1HeathsOldWaresBangalo.jpg
And among these saws there was this:
Needless to say, it didn't look this good at the time, and it has had a set and a sharpen since, but it was an unmistakable Disston Number 9 Backsaw.
The handle was complete, with no cracks or chips out of the spurs.
Even the brass saw nuts were in good shape.
The blade was straight and had only the slightest suggestion of rust dimpling.
This was a must have!
A quick check of my wallet showed that the moths had long ago vacated, and I was in the position of convincing my beloved of what an awesome buy this was, and could she go find an ATM while I guarded this piece of royalty of the sawmaker's art.
Long story short - it travelled with us to Brisbane, where I bored every one of my relatives who had not already been warned to avoid me, on what a miraculous find this had been, and how hard it was to find one of these in the wild. Maybe they are common somewhere, but this is the first that I have seen in thirty years of sniffing out old tools.
There is a little more on Disston Backsaws HERE.
no9saw.jpg
I have now more backsaws than I regularly use and a cull is in order.
It has prompted me to consider for my next BLOG post a small presentation on Backsaws from the perspective of usefulness.
Stay tuned.
In the meantime I am one happy little vegemite.
Interestingly, Peter has responded to this post with an application for a patent by William J Reagan, issued on December 8 1874 for an Improvement in Handles for Saws, that contains the recess for the thumb.
The inventor thought that this same improvement could be added to other tool handles such as those on planes.
The link can be found here:
Patent number: 157634 Filing date: Nov 14, 1874 Issue date: Dec 8, 1874
Many thanks Peter.
NOTE: - All images used from other websites are acknowledged under each image.
Subscribe to:
Posts (Atom)